 |
| Shutter speed: 1/160 F-stop: 5.6 |
 Within the lesson on Tuesday 10th November 2015, our element was given to us as depth. This gave me a chance to explore my camera even further, the first half of the lesson was you learning about different modes on the cameras. For example, Manual mode can be used to change all three, Shutter Speed, Aperture and ISO. We also got taught other modes on our cameras and the best way to capture different forms of depth. If I wanted to take an image of Shallow depth of field, a low F-stop is best because not much light is needed to capture the closer object and blurs the background- unless I want to capture the background and blur the foreground. Although I learnt in this lesson, you could still have a low F-stop and still do this by using manual focus. This was my first time experimenting with manual focus and really enjoyed this lesson.
Shallow Depth Of Field
A photo I do like.
 I really like this image I capture and believe is portrays Shallow depth really well. The further back the dice get the burlier they get, I used the F-stop of 5.6 and manually focused onto the foreground dice. I also believed the used of the flash really helped in this image because it brightened it up relieving more blur. I believe this image shows a clear way of my learning within this type of depth. Even though there is slight dark bits on the edges on the photo, I could easily edit these out. The shutter speed here was 1/5 and the F-stop was 9.0
A photo I don't like.

Progression.
If I were to do this shoot again I would make sure I would vary my subjects much more. For example use objects that aren't obvious and use ones more imaginative. I would also try to use imaginative ways of capturing people for show depth. Examples of ways I would improve are shown below...

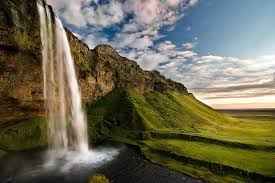
Wide Depth Of Field.
A photo I like.

I really like this image in portraying wide depth of field because there is a key leading line which takes focus through to the entire picture. Not just the use of depth of field in this image makes me like it but the colour and the autumnal atmosphere it creates. Personally autumn is the prettiest season and I was lucky enough to capture this depth image including the season as well. I also used a high F-stop (around F22). The entire image is in focus and if you look closer, you can see a building in the middle of the trees- the leading line takes eyes to this point. The shutter speed here was 1/200 and the F-stop was 8.0.
A photo I don't like.

Even though I really like the landscape aspect of this image, I don't believe it captures wide depth as well as it could. I should have zoomed out much more to have a more wider angle, there was also a gap in between the buildings that I cut out, although now I believe this would have been better- but due to the many people walking around, I had to try and cut them out as much as possible. Meaning I had to cut out the floor, yet I believe the floor could have helped create wide depth much more. The shutter speed was 1/200 and the F-stop was 18.
Progression.
If I were to re-do this part of today's task, I would make sure I would include much more of the surroundings to help create wide depth of field much better. I would also like to capture wide depth of field in more smaller objects- rather buildings and nature- even if nature is my favorite subject to capture. Examples of how I would like to progress in wide depth of field are shown below.

good analysis, try to ensure that you place the camera settings in all of your work diary and straight images.
ReplyDeleteThis is an excellent post showing a good level of understanding with regards to camera control and depth of field.. . You standard of experimentation is good as you have adjusted the aperture achieving a variety of shots. There are some spelling mistakes e.g. burlier = blurry or more blurred.. I like the image comparisons that you have made in exploring depth of field.. your progression shows a real interest in developing your photography further.. - Well done.
ReplyDelete