image mode, CMYK colour, (in the channels not layer) select yellow layer, cmd A, cmd c, go back into layer, cmd alt Z (step back) cmd v, re name flaws, cmd I (inver), (blend mode) soft light, opacity, add layer mask (invert mask) alt add layer mask, make sure background is white, select brush, make it big, 50% opacity, paint the skin,
Cloning out wrinkles and blemishes
cmd j, re name-wrinkles and blemishes, spot healing brush, alt and drag, go over any imperfections, reduce opacity, fill colour mask with grey
The original

The edited...

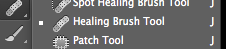
 This image is after retouching the skin and the cloning out wrinkles and blemishes (it will show more of a difference if you click the image to enlarge it) I first touched the skin making it a tiny bit darker, giving her more of a tone- and smoothing out the skin. I think blended her skin- smoothing out the blemishes on her face and forehead. I also saw deep creases around the eyes so I removed these as well. I really like this edited picture because her skin looks much clearer. I did attempt to blemish out her freckles although this made the subject look very fake and I did not like this. The way I blemished her skin was by using the "healing brush tool" as shown in the screen shot above. I then pressed alt and clicked part of her skin, when I done this, a little finding came up and then I dragged the pointed on the part of her face I wanted to blemish out. This was a really easy way to removed any unnecessary blemishes. To removed the wrinkles around her eyes, I used the patch tool shown at the bottom of the screen shot above, then roughly drew around the wrinkles. as shown in the screen shot on the left. Then I moved the selected part on the clear part of the face and then it replaced the wrinkle. I really like this effect and believe it makes it much better as it looks much clearer.
The retouching of the skin…


Then whilst in channels, you can see a verity of different layers. You want to click on the yellow bar, making the image look like the one show on the left.
You then want to click CMD A, this will select the whole picture.
To copy it you want to click CMD C
Then when back on the layer side, click ALT CMD and Z, this will undo the changes (do so until the image is back to the normal state.)

To make it easier, this layer should be renamed FLAWS, so you know where this layer is later on.

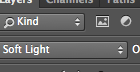

To change the invert, you need to click on the bar that originally says normal, you need to change this to soft light. If you wish, this is the stage you can change the opacity if necessary.

By clicking ALT you want to click the "add layer mask" tool. This should make you layer section look like this (shown above).

As the background here is shown as black, you need to make sure you paint brush is in the colour white because otherwise it will not make a difference to your image.
The final step is to just move your brush across the face, the parts that you want to retouch!
No comments:
Post a Comment